Elasticsearch系列(2):Kibana安装与基本REST API
简介
Kibana是一个针对Elasticsearch的开源分析及可视化平台,使用Kibana可以查询、查看并与存储在ES索引的数据进行交互操作,使用Kibana能执行高级的数据分析,并能以图表、表格和地图的形式查看数据。
Kibana安装和使用
安装Kibana
下载:
注意Kibana版本需要和Elasticsearch一致。
cd /opt/
wget https://artifacts.elastic.co/downloads/kibana/kibana-7.12.1-linux-x86_64.tar.gz
解压:
tar -zxvf kibana-7.12.1-linux-x86_64.tar.gz
修改Kibana配置文件
修改/opt/kibana-7.12.1-linux-x86_64/config/kibana.yml:
server.port: 5601
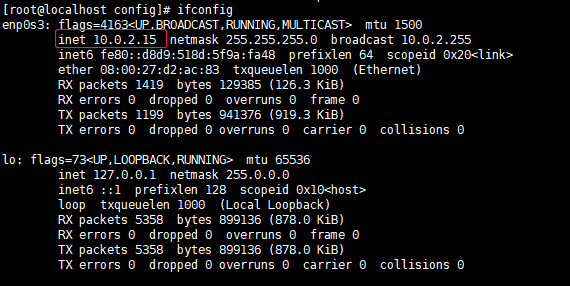
server.host: "10.0.2.15"
elasticsearch.hosts: ["http://localhost:9200"]
server.port:kibana端口,默认为5601。
elasticsearch.hosts:Elasticsearch服务地址,默认为http://localhost:9200。
server.host:要允许远程用户连接到Kibana,需要将该参数设置为一个非环回地址。
通过ifconfig命令查看该地址:

启动Kibana
1.首先启动Elasticsearch。
2.启动Kibana,使用root用户和非root用户启动Kibana有点区别。
使用root用户启动:
kibana默认不允许使用root用户启动,使用root用户启动需要启动时指定–allow-root。
/opt/kibana-7.12.1-linux-x86_64/bin/kibana --allow-root
使用非root用户启动:
如使用es用户启动,首先保证kibana目录拥有者为es用户,否则需要设置kibana目录拥有者为es用户。
chown -R es:es kibana-7.12.1-linux-x86_64
然后在切换到es用户启动
/opt/kibana-7.12.1-linux-x86_64/bin/kibana
Kibana启动成功后,浏览器访问http://localhost:5601/显示如下界面则表示启动成功:

Kibana使用
成功启动Kibana后,可以使用Kibana的Dev Tools进行Elasticsearch的REST API调用:

如查询Elasticsearch中的索引信息:

后续REST API的调用都将采用这种方式。
索引操作
接下来以user索引为例,简单介绍下索引的基本操作。
创建索引
请求:
PUT /user
响应:
{
  "acknowledged" : true,
  "shards_acknowledged" : true,
  "index" : "user"
}
acknowledged:响应结果。
shards_acknowledged:分片结果。
index:索引名称。
索引名称需要满足以下条件
-
必须小写。
-
不能包含、/、*、?、”、<、>、|、空格符、,、#、:。
-
不能以-、_、+开头。
-
不能为.或..。
-
不能超过255字节(注意是字节不是字符)。
创建具有特定设置的索引
创建具有指定分片数和复制分片数的索引:
PUT /user
{
  "settings": {
    "index": {
      "number_of_shards": 3,
      "number_of_replicas": 2
    }
  }
}
创建索引并显示指定映射信息
显示的指定字段的数据类型:
PUT /user
{
  "mappings": {
    "properties": {
      "age":    { "type": "integer" },
      "email":  { "type": "keyword"  },
      "name":   { "type": "text"  }
    }
  }
}
数据类型可以参考官网:Field data types
查询索引信息
请求:
GET /user
响应:
{
  "user" : {
    "aliases" : { },
    "mappings" : { },
    "settings" : {
      "index" : {
        "routing" : {
          "allocation" : {
            "include" : {
              "_tier_preference" : "data_content"
            }
          }
        },
        "number_of_shards" : "1",
        "provided_name" : "user",
        "creation_date" : "1622601754789",
        "number_of_replicas" : "1",
        "uuid" : "iz1nYZOlTSC94Ijry5YiPg",
        "version" : {
          "created" : "7120199"
        }
      }
    }
  }
}
user:索引名称。
aliases:别名。
mappings:映射。
settings:设置。
creation_date:创建时间。
number_of_shards:主分片数量。
number_of_replicas:副分片数量。
uuid:索引唯一标识。
version:版本。
provided_name:索引名称。
删除索引
请求:
DELETE /user
响应:
{
  "acknowledged" : true
}
更多索引操作可以参考官网:Index APIs
文档操作
创建文档
请求:
POST /user/_doc/
{
  "age":18,
  "email":"asd.qq.com",
  "name":"buhe"
}
响应:
{
  "_index" : "user",
  "_type" : "_doc",
  "_id" : "Q2i2y3kB7sfcwRgV3OlC",
  "_version" : 1,
  "result" : "created",
  "_shards" : {
    "total" : 2,
    "successful" : 1,
    "failed" : 0
  },
  "_seq_no" : 0,
  "_primary_term" : 1
}
_index:索引名称。
_type:文档类型。
_id:文档的唯一标识。如果没有指定则默认随机生成。
_version:文档版本,每次更新文档时增加。
result:索引操作的结果(created/updated)。
_shards:提供有关索引操作的复制过程的信息。
_shards.total:表示索引操作应该在多少个分片副本(主分片和复制分片)上执行。
_shards.successful:表示索引操作成功的分片副本数。索引操作成功时,successful至少为1。
_shards.failed:表示索引操作失败的分片副本数。
_seq_no:分配给文档以进行索引操作的序列号。序列号用于确保文档的旧版本不会覆盖新版本。
_primary_term:为索引操作分配给文档的主要术语。
通过文档id查询文档数据
请求:
GET /user/_doc/Q2i2y3kB7sfcwRgV3OlC
响应:
{
  "_index" : "user",
  "_type" : "_doc",
  "_id" : "Q2i2y3kB7sfcwRgV3OlC",
  "_version" : 1,
  "_seq_no" : 0,
  "_primary_term" : 1,
  "found" : true,
  "_source" : {
    "age" : 18,
    "email" : "asd.qq.com",
    "name" : "buhe"
  }
}
_source为JSON格式的文档数据。
修改文档
请求:
POST user/_update/Q2i2y3kB7sfcwRgV3OlC
{
    "doc":{
      "age" : 38
    }
}
响应:
{
  "_index" : "user",
  "_type" : "_doc",
  "_id" : "Q2i2y3kB7sfcwRgV3OlC",
  "_version" : 5,
  "result" : "updated",
  "_shards" : {
    "total" : 2,
    "successful" : 1,
    "failed" : 0
  },
  "_seq_no" : 28,
  "_primary_term" : 1
}
删除文档
请求:
DELETE /user/_doc/Q2i2y3kB7sfcwRgV3OlC
响应:
{
  "_index" : "user",
  "_type" : "_doc",
  "_id" : "Q2i2y3kB7sfcwRgV3OlC",
  "_version" : 6,
  "result" : "deleted",
  "_shards" : {
    "total" : 2,
    "successful" : 1,
    "failed" : 0
  },
  "_seq_no" : 29,
  "_primary_term" : 1
}
文档的批量操作
可以使用Bulk API来完成文档的批量操作,Bulk API的每一个命令占用两行,每行都应该以
结束。
第一行为元数据,第二行为有效载体,例如批量创建文档如下:
POST /user/_bulk
{"create":{"_id":6}}
{"age":18,"email":"asd.qq.com","name":"buhe1"}
{"create":{"_id":7}}
{"age":18,"email":"asd.qq.com","name":"buhe2"}
{"create":{"_id":8}}
{"age":18,"email":"asd.qq.com","name":"buhe3"}
{"create":{"_id":9}}
{"age":18,"email":"asd.qq.com","name":"buhe4"}
{"create":{"_id":10}}
{"age":18,"email":"asd.qq.com","name":"buhe5"}
Bulk API不是原子操作,对应每个命令都会有一个执行结果,即使某个命令执行失败也不会影响其他命令的执行。响应:
{
  "took" : 14,
  "errors" : false,
  "items" : [
    {
      "create" : {
        "_index" : "user",
        "_type" : "_doc",
        "_id" : "6",
        "_version" : 1,
        "result" : "created",
        "_shards" : {
          "total" : 2,
          "successful" : 1,
          "failed" : 0
        },
        "_seq_no" : 37,
        "_primary_term" : 2,
        "status" : 201
      }
    },
    其他省略......
    }
  ]
}
更多文档操作可以参考官网:Document APIs


