Python之文件操作
一、文件基础操作
读文本文件
1.打开文件
file_object = open("info.txt", mode="rt", encoding="utf-8")

2.读取文件内容,并赋值给data
data = file_object.read()

3.关闭文件
file_object.close()

print(data)
读非文本文件
file_object = open("a1.png", mode="rb")
data = file_object.read()
file_object.close()

print(data) # x91xf6xf2x83x8aQFfvx8b7xccxedxc3}x7fTx9d{.3.xf1{xe8...
写入文本文件
1.打开文件
路径:t1.txt
模式:wb(要求写入的内容需要是字节类型)
file_object = open("t1.txt", mode="wb")

2.写入内容
file_object.write(    "内容".encode("utf-8")    )

3.文件关闭
file_object.close()

##写入图片等非文本文件
f2 = open("a2.png",mode="wb") #以二进制格式写入
f2.write(content)
f2.close()
例子:
案例1:用户注册
user = input("请输入用户名:")
pwd = input("请输入密码:")
data = "{}-{}".format(user, pwd)
file_object = open("files/info.txt", mode="wt", encoding="utf-8")
file_object.write(data)
file_object.close()
案例2:多用户注册
w写入文件,先清空文件;再在文件中写入内容。
while True:
    user = input("请输入用户名:")
    if user.upper() == "Q":
        break
    pwd = input("请输入密码:")
    data = "{}-{}
".format(user, pwd)
    file_object.write(data)
file_object.close()
文件打开模式
-
只读:
r、rt、rb(用)- 存在,读
- 不存在,报错
-
只写:
w、wt、wb(用)- 存在,清空再写
- 不存在,创建再写
-
只写:
x、xt、xb- 存在,报错
- 不存在,创建再写。
-
只写:
a、at、ab【尾部追加】(用)- 存在,尾部追加。
- 不存在,创建再写。
注:r+、rt+、rb+,默认光标位置:起始位置;
w+、wt+、wb+,默认光标位置:起始位置(清空文件);
– x+、xt+、xb+,默认光标位置:起始位置(新文件)
a+、at+、ab+,默认光标位置:末尾
例如:
file_object = open("files/account.txt", mode="a")
while True:
    user = input("用户名:")
    if user.upper() == "Q":
        break
    pwd = input("密码:")
    data = "{}-{}
".format(user, pwd)
    file_object.write(data)

file_object.close()
上下文管理
之前对文件进行操作时,每次都要打开和关闭文件,比较繁琐且容易忘记关闭文件。
以后再进行文件操作时,推荐大家使用with上下文管理,它可以自动实现关闭文件。
如下:
with open("xxxx.txt", mode="rb") as file_object: data = file_object.read() print(data)
如遇到打开多个文件可以写成:
with open("xxxx.txt", mode="rb") as f1, open("xxxx.txt", mode="rb") as f2: pass
接下来举例说明常用的几种文件处理方法:
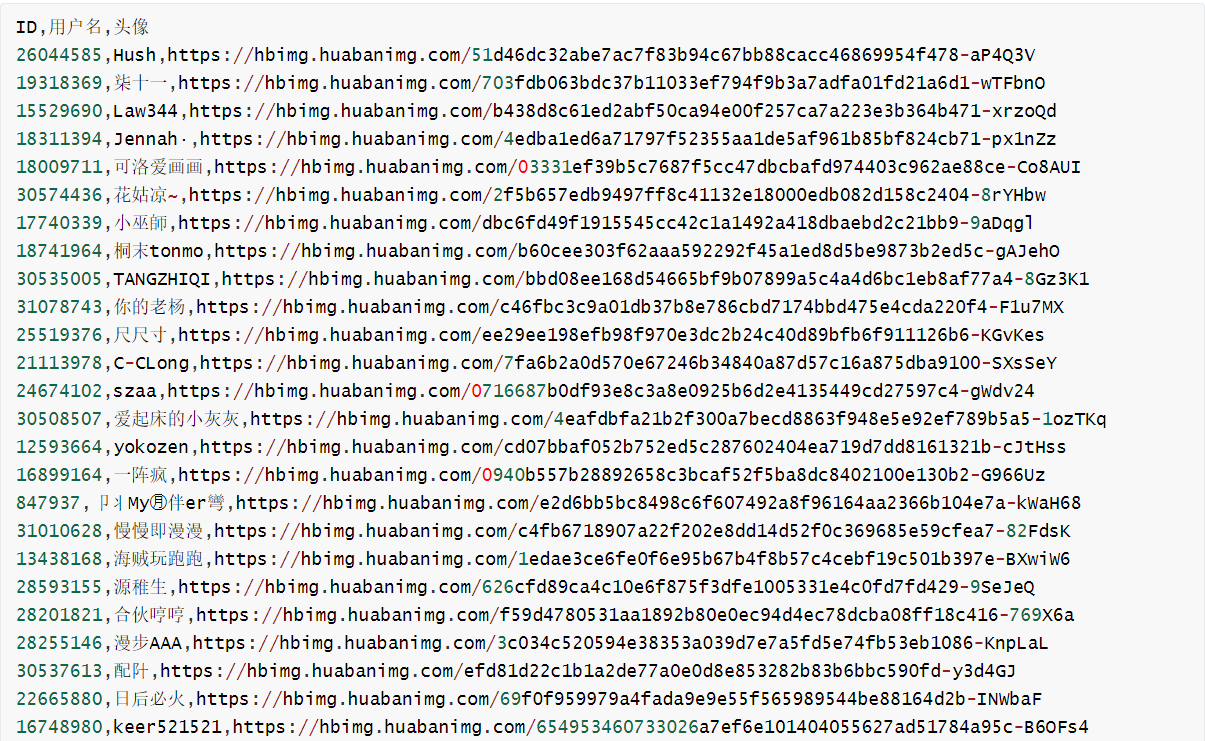
csv文件处理模式:

代码如下:
import requests

with open("files/mv.csv", mode="r", encoding="utf-8") as file_object:
    file_object.readline()
    for line in file_object:
        user_id, username, url = line.strip().split(",")
        print(username, url)
        # 1.根据URL下载图片
        res = requests.get(
            url=url,
            headers={
                "User-Agent": "Mozilla/5.0 (Macintosh; Intel Mac OS X 10_15_7) AppleWebKit/537.36 (KHTML, like Gecko) Chrome/87.0.4280.88 Safari/537.36"
            }
        )
        # 检查images目录是否存在?不存在,则创建images目录
        if not os.path.exists("images"):
            # 创建images目录
            os.makedirs("images")
        # 2.将图片的内容写入到文件
        with open("images/{}.png".format(username), mode="wb") as img_object:
            img_object.write(res.content)

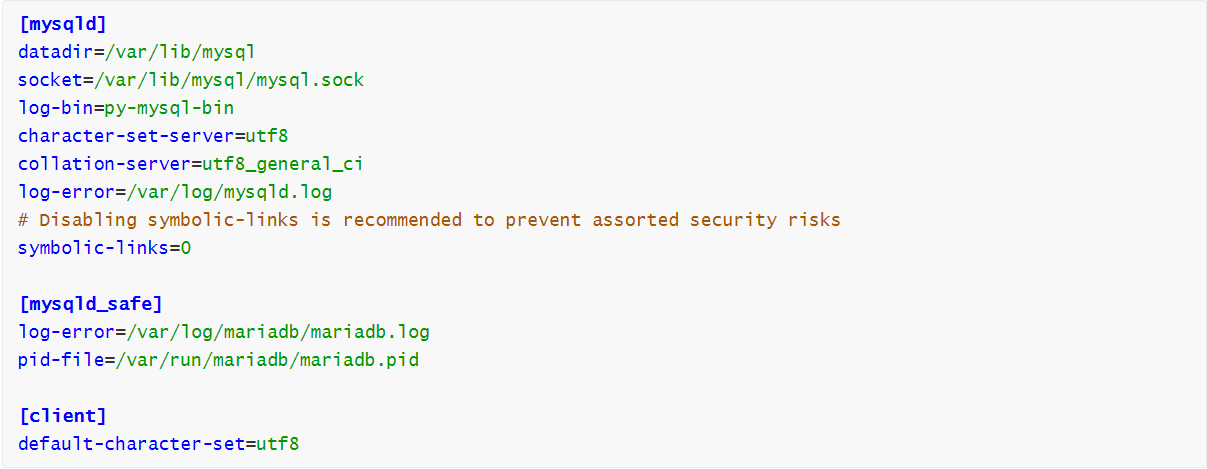
调取所有的节点
import configparser

config = configparser.ConfigParser()
config.read("/Users/wupeiqi/PycharmProjects/luffyCourse/day09/files/my.conf", encoding="utf-8")
# config.read("my.conf", encoding="utf-8")
ret = config.sections()
print(ret)

>>输出
["mysqld", "mysqld_safe", "client"]
读取节点下的键值
import configparser

config = configparser.ConfigParser()
config.read("/Users/wupeiqi/PycharmProjects/luffyCourse/day09/files/my.conf", encoding="utf-8")
# config.read("my.conf", encoding="utf-8")
item_list = config.items("mysqld_safe")
print(item_list)

>>输出
[("log-error", "/var/log/mariadb/mariadb.log"), ("pid-file", "/var/run/mariadb/mariadb.pid")]
读取节点下值(根据 节点+键 )
import configparser

config = configparser.ConfigParser()
config.read("/Users/wupeiqi/PycharmProjects/luffyCourse/day09/files/my.conf", encoding="utf-8")

value = config.get("mysqld", "log-bin")
print(value)

>>输出
py-mysql-bin
检查、删除、添加节点
import configparser

config = configparser.ConfigParser()
config.read("/Users/wupeiqi/PycharmProjects/luffyCourse/day09/files/my.conf", encoding="utf-8")
# config.read("my.conf", encoding="utf-8")


# 检查
has_sec = config.has_section("mysqld")
print(has_sec)

# 添加节点
config.add_section("SEC_1")
# 节点中设置键值
config.set("SEC_1", "k10", "123")
config.set("SEC_1", "name", "哈哈哈哈哈")

config.add_section("SEC_2")
config.set("SEC_2", "k10", "123")
# 内容写入新文件
config.write(open("/Users/wupeiqi/PycharmProjects/luffyCourse/day09/files/xxoo.conf", "w"))


# 删除节点
config.remove_section("SEC_2")
# 删除节点中的键值
config.remove_option("SEC_1", "k10")
config.write(open("/Users/wupeiqi/PycharmProjects/luffyCourse/day09/files/new.conf", "w"))
XML格式文件

注意:在Python开发中用的相对来比较少,大家作为了解即可(后期课程在讲解微信支付、微信公众号消息处理 时会用到基于xml传输数据)。
读取文件和内容
from xml.etree import ElementTree as ET

# ET去打开xml文件
tree = ET.parse("files/xo.xml")

# 获取根标签
root = tree.getroot()

print(root) # <Element "data" at 0x7f94e02763b0>
from xml.etree import ElementTree as ET

content = """
<data>
    <country name="Liechtenstein">
        <rank updated="yes">2</rank>
        <year>2023</year>
        <gdppc>141100</gdppc>
        <neighbor direction="E" name="Austria" />
        <neighbor direction="W" name="Switzerland" />
    </country>
     <country name="Panama">
        <rank updated="yes">69</rank>
        <year>2026</year>
        <gdppc>13600</gdppc>
        <neighbor direction="W" name="Costa Rica" />
        <neighbor direction="E" name="Colombia" />
    </country>
</data>
"""

root = ET.XML(content)
print(root)  # <Element "data" at 0x7fdaa019cea0>
读取节点数据
from xml.etree import ElementTree as ET

content = """
<data>
    <country name="Liechtenstein" id="999" >
        <rank>2</rank>
        <year>2023</year>
        <gdppc>141100</gdppc>
        <neighbor direction="E" name="Austria" />
        <neighbor direction="W" name="Switzerland" />
    </country>
     <country name="Panama">
        <rank>69</rank>
        <year>2026</year>
        <gdppc>13600</gdppc>
        <neighbor direction="W" name="Costa Rica" />
        <neighbor direction="E" name="Colombia" />
    </country>
</data>
"""

# 获取根标签 data
root = ET.XML(content)

country_object = root.find("country")
print(country_object.tag, country_object.attrib)
gdppc_object = country_object.find("gdppc")
print(gdppc_object.tag,gdppc_object.attrib,gdppc_object.text)
from xml.etree import ElementTree as ET

content = """
<data>
    <country name="Liechtenstein">
        <rank>2</rank>
        <year>2023</year>
        <gdppc>141100</gdppc>
        <neighbor direction="E" name="Austria" />
        <neighbor direction="W" name="Switzerland" />
    </country>
     <country name="Panama">
        <rank>69</rank>
        <year>2026</year>
        <gdppc>13600</gdppc>
        <neighbor direction="W" name="Costa Rica" />
        <neighbor direction="E" name="Colombia" />
    </country>
</data>
"""

# 获取根标签 data
root = ET.XML(content)

# 获取data标签的孩子标签
for child in root:
    # child.tag = conntry
    # child.attrib = {"name":"Liechtenstein"}
    print(child.tag, child.attrib)
    for node in child:
        print(node.tag, node.attrib, node.text)
通过iter跳级获取所需数据
from xml.etree import ElementTree as ET

content = """
<data>
    <country name="Liechtenstein">
        <rank>2</rank>
        <year>2023</year>
        <gdppc>141100</gdppc>
        <neighbor direction="E" name="Austria" />
        <neighbor direction="W" name="Switzerland" />
    </country>
     <country name="Panama">
        <rank>69</rank>
        <year>2026</year>
        <gdppc>13600</gdppc>
        <neighbor direction="W" name="Costa Rica" />
        <neighbor direction="E" name="Colombia" />
    </country>
</data>
"""

root = ET.XML(content)

for child in root.iter("year"):
    print(child.tag, child.text)
通过findall跳级获取所需数据
from xml.etree import ElementTree as ET

content = """
<data>
    <country name="Liechtenstein">
        <rank>2</rank>
        <year>2023</year>
        <gdppc>141100</gdppc>
        <neighbor direction="E" name="Austria" />
        <neighbor direction="W" name="Switzerland" />
    </country>
     <country name="Panama">
        <rank>69</rank>
        <year>2026</year>
        <gdppc>13600</gdppc>
        <neighbor direction="W" name="Costa Rica" />
        <neighbor direction="E" name="Colombia" />
    </country>
</data>
"""

root = ET.XML(content)
v1 = root.findall("country")
print(v1)
或者也可通过find逐步获取到所需数据
from xml.etree import ElementTree as ET

content = """
<data>
    <country name="Liechtenstein">
        <rank>2</rank>
        <year>2023</year>
        <gdppc>141100</gdppc>
        <neighbor direction="E" name="Austria" />
        <neighbor direction="W" name="Switzerland" />
    </country>
     <country name="Panama">
        <rank>69</rank>
        <year>2026</year>
        <gdppc>13600</gdppc>
        <neighbor direction="W" name="Costa Rica" />
        <neighbor direction="E" name="Colombia" />
    </country>
</data>
"""

v2 = root.find("country").find("rank")
print(v2.text)
修改和删除节点
注意:修改和删除节点数据后需要通过如下代码进行保存才能成功:
tree = ET.ElementTree(root)
tree.write("new.xml", encoding="utf-8")
例如:
from xml.etree import ElementTree as ET

content = """
<data>
    <country name="Liechtenstein">
        <rank>2</rank>
        <year>2023</year>
        <gdppc>141100</gdppc>
        <neighbor direction="E" name="Austria" />
        <neighbor direction="W" name="Switzerland" />
    </country>
     <country name="Panama">
        <rank>69</rank>
        <year>2026</year>
        <gdppc>13600</gdppc>
        <neighbor direction="W" name="Costa Rica" />
        <neighbor direction="E" name="Colombia" />
    </country>
</data>
"""

root = ET.XML(content)

# 修改节点内容和属性
rank = root.find("country").find("rank")
print(rank.text)
rank.text = "999"
rank.set("update", "2020-11-11")
print(rank.text, rank.attrib)
############ 保存文件 ############
tree = ET.ElementTree(root)
tree.write("new.xml", encoding="utf-8")


# 删除节点
root.remove( root.find("country") )
print(root.findall("country"))

############ 保存文件 ############
tree = ET.ElementTree(root)
tree.write("newnew.xml", encoding="utf-8")
构建或生成一个新的xml文件
第一种创建流程简述:
1、创建根节点->创建儿子节点->最后创建孙节点->……
2、通过append语句来传导根节点、儿子节点以及孙节点之间的关联
注:short_empty_elements 是唯一一个关键字参数,是Python 3.4新增加的参数。它用于控制那些不包含任何内容的elements的格式,如果该参数值为Ture则这些标签将会被输出为一个单独的自关闭标签(如: ),如果值为False则这些标签将会被输出为一个标签对(如:<a></a>)
如下:
from xml.etree import ElementTree as ET

# 创建根标签
root = ET.Element("home")

# 创建节点大儿子
son1 = ET.Element("son", {"name": "儿1"})
# 创建小儿子
son2 = ET.Element("son", {"name": "儿2"})

# 在大儿子中创建两个孙子
grandson1 = ET.Element("grandson", {"name": "儿11"})
grandson2 = ET.Element("grandson", {"name": "儿12"})
son1.append(grandson1)
son1.append(grandson2)

# 把儿子添加到根节点中
root.append(son1)
root.append(son2)

tree = ET.ElementTree(root)
tree.write("oooo.xml", encoding="utf-8", short_empty_elements=False)
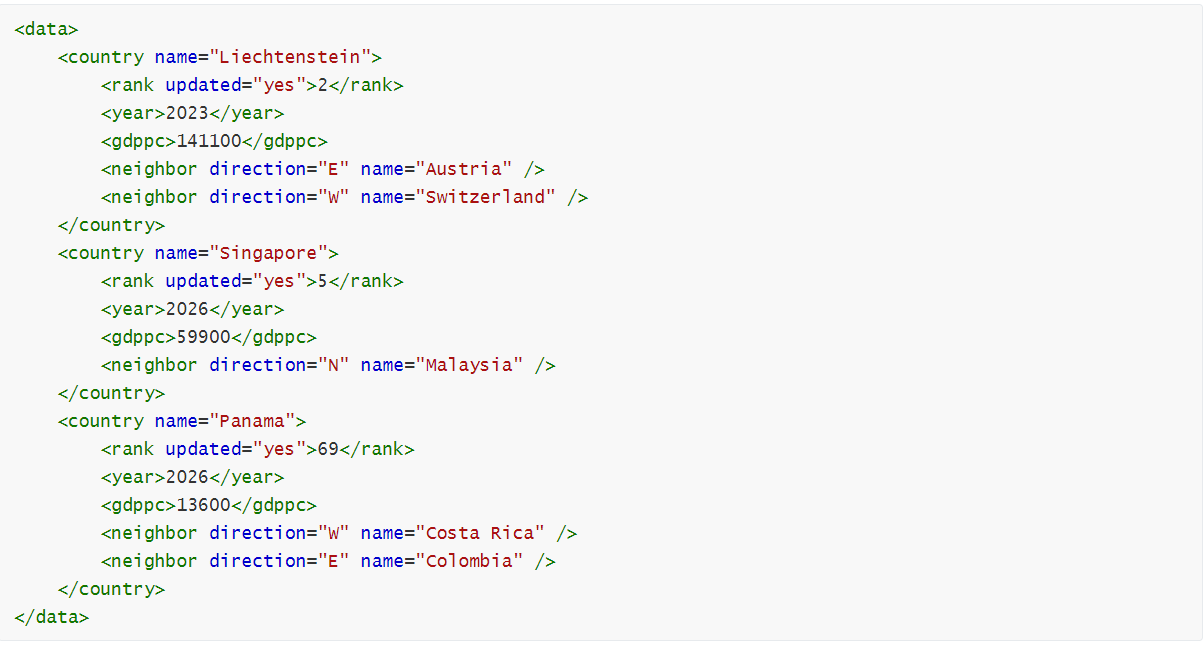
结果如下图所示:

第二种创建流程简述:
通过SubElement直接建立父子孙节点之间的关联
第一种方式代码按照这种方式还可以通过SubElement形式实现,代码如下:
from xml.etree import ElementTree as ET


# 创建根节点
root = ET.Element("famliy")


# 创建节点大儿子
son1 = ET.SubElement(root, "son", attrib={"name": "儿1"})
# 创建小儿子
son2 = ET.SubElement(root, "son", attrib={"name": "儿2"})

# 在大儿子中创建一个孙子
grandson1 = ET.SubElement(son1, "age", attrib={"name": "儿11"})
grandson1.text = "孙子"


et = ET.ElementTree(root)  #生成文档对象
et.write("test.xml", encoding="utf-8")
拓展:通过上述两种构建xml文件的方式,可以应用到微信中去<![CDATA[你好呀]]
格式如下:
from xml.etree import ElementTree as ET

# 创建根节点
root = ET.Element("user")
root.text = "<![CDATA[你好呀]]"

et = ET.ElementTree(root)  # 生成文档对象
et.write("test.xml", encoding="utf-8")
案例:
content = """<xml>
    <ToUserName><![CDATA[gh_7f083739789a]]></ToUserName>
    <FromUserName><![CDATA[oia2TjuEGTNoeX76QEjQNrcURxG8]]></FromUserName>
    <CreateTime>1395658920</CreateTime>
    <MsgType><![CDATA[event]]></MsgType>
    <Event><![CDATA[TEMPLATESENDJOBFINISH]]></Event>
    <MsgID>200163836</MsgID>
    <Status><![CDATA[success]]></Status>
</xml>"""

from xml.etree import ElementTree as ET

info = {}
root = ET.XML(content)
for node in root:
    # print(node.tag,node.text)
    info[node.tag] = node.text
print(info)
Excel格式文件
读Excel
读sheet
from openpyxl import load_workbook

wb = load_workbook("files/p1.xlsx")

# sheet相关操作

# 1.获取excel文件中的所有sheet名称
"""
print(wb.sheetnames) # ["数据导出", "用户列表", "Sheet1", "Sheet2"]
"""

# 2.选择sheet,基于sheet名称
"""
sheet = wb["数据导出"]
cell = sheet.cell(1, 2)
print(cell.value)
"""

# 3.选择sheet,基于索引位置
"""
sheet = wb.worksheets[0]
cell = sheet.cell(1,2)
print(cell.value)
"""

# 4.循环所有的sheet
"""
for name in wb.sheetnames:
    sheet = wb[name]
    cell = sheet.cell(1, 1)
    print(cell.value)
"""
"""
for sheet in wb.worksheets:
    cell = sheet.cell(1, 1)
    print(cell.value)
"""
"""
for sheet in wb:
    cell = sheet.cell(1, 1)
    print(cell.value)
"""
读sheet中单元格的数据
from openpyxl import load_workbook

wb = load_workbook("files/p1.xlsx")
sheet = wb.worksheets[0]

# 1.获取第N行第N列的单元格(位置是从1开始)
"""
cell = sheet.cell(1, 1)

print(cell.value)
print(cell.style)
print(cell.font)
print(cell.alignment)
"""

# 2.获取某个单元格
"""
c1 = sheet["A2"]
print(c1.value)

c2 = sheet["D4"]
print(c2.value)
"""

# 3.第N行所有的单元格
"""
for cell in sheet[1]:
    print(cell.value)
"""

# 4.所有行的数据(获取某一列数据)
"""
for row in sheet.rows:
    print(row[0].value, row[1].value)
"""

# 5.获取所有列的数据
"""
for col in sheet.columns:
    print(col[1].value)
"""
读合并的单元格

from openpyxl import load_workbook

wb = load_workbook("files/p1.xlsx")
sheet = wb.worksheets[2]

# 获取第N行第N列的单元格(位置是从1开始)
c1 = sheet.cell(1, 1)
print(c1)  # <Cell "Sheet1".A1>
print(c1.value) # 用户信息

c2 = sheet.cell(1, 2)
print(c2)  # <MergedCell "Sheet1".B1>
print(c2.value) # None
from openpyxl import load_workbook

wb = load_workbook("files/p1.xlsx")
sheet = wb.worksheets[2]
for row in sheet.rows:
    print(row)
>>> 输出结果
(<Cell "Sheet1".A1>, <MergedCell "Sheet1".B1>, <Cell "Sheet1".C1>)
(<Cell "Sheet1".A2>, <Cell "Sheet1".B2>, <Cell "Sheet1".C2>)
(<Cell "Sheet1".A3>, <Cell "Sheet1".B3>, <Cell "Sheet1".C3>)
(<MergedCell "Sheet1".A4>, <Cell "Sheet1".B4>, <Cell "Sheet1".C4>)
(<Cell "Sheet1".A5>, <Cell "Sheet1".B5>, <Cell "Sheet1".C5>)
写Excel
该操作可以总结为在原有excel文件上修改以及新建excel文件,代码块如下所示:
在已有excel中修改需先导入:load_workbook;
新建excel文件使用的是workbook。
示例:
已有excel文件进行修改:
from openpyxl import load_workbook
wb = load_workbook("files/p1.xlsx")
sheet = wb.worksheets[0]
# 找到单元格,并修改单元格的内容
cell = sheet.cell(1, 1)
cell.value = "新的开始"

# 将excel文件保存到p1.xlsx文件中
wb.save("files/p2.xlsx")
新建excel文件:
from openpyxl import workbook
wb = workbook.workbook()
sheet = wb.worksheets[0]
# 找到单元格,并修改单元格的内容
cell = sheet.cell(1, 1)
cell.value = "新的开始"

# 将excel文件保存到p2.xlsx文件中
wb.save("files/p2.xlsx")
注:对于excel文件处理方法中还有很多内容,特别是对于文件的格式设置等需要单独阐述,该部门内容将会在后续随笔中更新,敬请期待!
压缩文件
import shutil

# 1. 压缩文件
"""
# base_name,压缩后的压缩包文件
# format,压缩的格式,例如:"zip", "tar", "gztar", "bztar", or "xztar".
# root_dir,要压缩的文件夹路径
"""
# shutil.make_archive(base_name=r"datafile",format="zip",root_dir=r"files")


# 2. 解压文件
"""
# filename,要解压的压缩包文件
# extract_dir,解压的路径
# format,压缩文件格式
"""
# shutil.unpack_archive(filename=r"datafile.zip", extract_dir=r"xxxxxx/xo", format="zip")
注:文件处理中,对于路径的要求很高,最好使用绝对路径,该部门内容也需要另起随笔描述。
知识结构总结
1、在处理文件前需要高清文件所在位置或需要存储文件的位置,找到绝对路径;
2、可以通过os模块中的os.abspath获取到当前程序绝对路径,再由绝对路径获取到上级文件夹,代码如下:
import os
base_dir = os.path.dirname(os.path.abspath(__file__))
file_path = os.path.join(base_dir, "files", "info.txt")
3、windows系统用户与mac系统用户使用时,由于环境不同,路径描述方式不一样,手动添加路径时,需要使用r"路径"或通过加入来消除转义字符对于路径的影响,最后可以通过os.path.join来拼接路径(生成的是字符串类型)
4、基本文件的读写read和write、打开模式mode以及上下文管理with open需要掌握
5、对于csv、ini和xml等特定文件的操作了解即可,用到时翻阅随笔即可。


