设计一个基于flask的高并发高可用的查询ip的http服务
结构设计
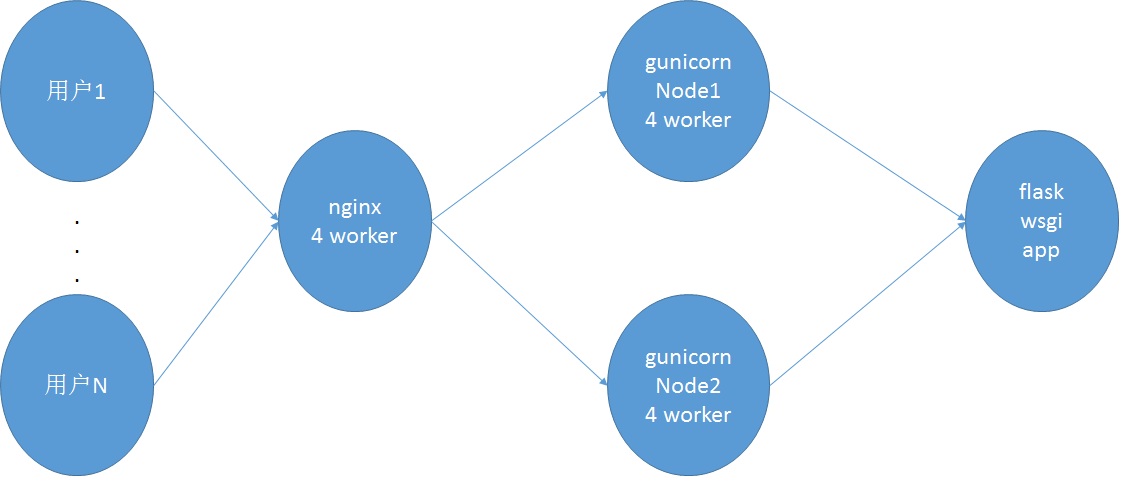
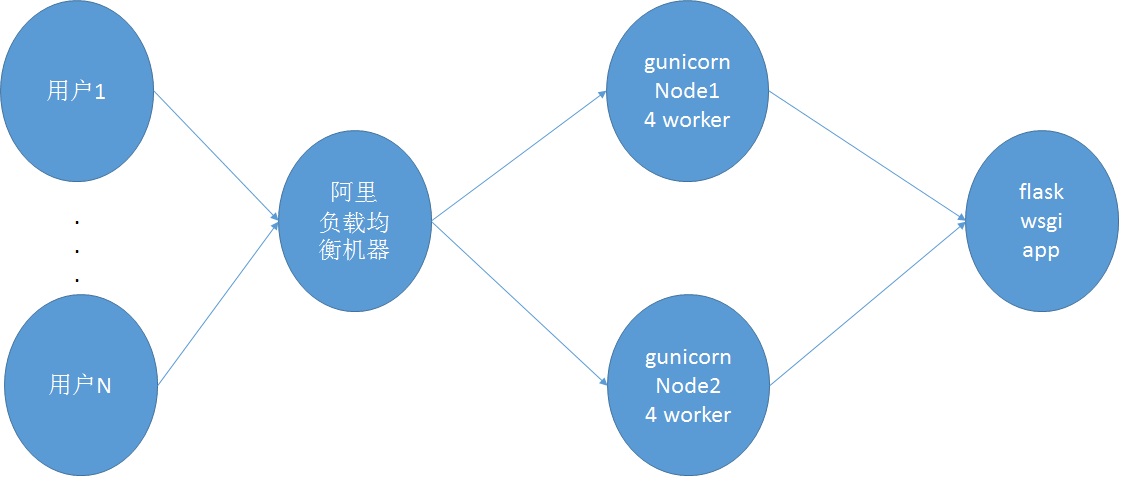
基础架构为flask+gunicorn+负载均衡,负载均衡分为阿里云硬件负载均衡服务和软负载nginx。gunicorn使用supervisor进行管理。
使用nginx软件负载结构图

使用阿里云硬件负载均衡服务结构图

因为flask app需要在内存中保存ip树以及国家、省份、城市相关的字典,因此占用内存较高。gunicorn的1个worker需要占用300M内存,nginx的4个worker内存占用较小(不到100M),因此占用1.3G的内存(即需要一个2G内存的服务器)。当gunicorn任意一个节点挂断或者升级时,另外一个节点仍然在使用,不会影响整体服务
ip数据库
IP库(也叫IP地址数据库),是由专业技术人员经过长时间通过多种技术手段收集而来的,并且长期有专业人员进行更新、维护、补充。
ip数据库解析查询代码
基于二叉查找树实现
import struct
from socket import inet_aton, inet_ntoa
import os
import sys

sys.setrecursionlimit(1000000)

_unpack_V = lambda b: struct.unpack("<L", b)
_unpack_N = lambda b: struct.unpack(">L", b)
_unpack_C = lambda b: struct.unpack("B", b)


class IpTree:
    def __init__(self):
        self.ip_dict = {}
        self.country_codes = {}
        self.china_province_codes = {}
        self.china_city_codes = {}

    def load_country_codes(self, file_name):
        try:
            path = os.path.abspath(file_name)
            with open(path, "rb") as f:
                for line in f.readlines():
                    data = line.split("	")
                    self.country_codes[data[0]] = data[1]
                    # print self.country_codes
        except Exception as ex:
            print "cannot open file %s: %s" % (file, ex)
            print ex.message
            exit(0)

    def load_china_province_codes(self, file_name):
        try:
            path = os.path.abspath(file_name)
            with open(path, "rb") as f:
                for line in f.readlines():
                    data = line.split("	")
                    provinces = data[2].split("")
                    self.china_province_codes[provinces[0]] = data[0]
                    # print self.china_province_codes
        except Exception as ex:
            print "cannot open file %s: %s" % (file, ex)
            print ex.message
            exit(0)

    def load_china_city_codes(self, file_name):
        try:
            path = os.path.abspath(file_name)
            with open(path, "rb") as f:
                for line in f.readlines():
                    data = line.split("	")
                    cities = data[3].split("")
                    self.china_city_codes[cities[0]] = data[0]
        except Exception as ex:
            print "cannot open file %s: %s" % (file, ex)
            print ex.message
            exit(0)

    def loadfile(self, file_name):
        try:
            ipdot0 = 254
            path = os.path.abspath(file_name)
            with open(path, "rb") as f:
                local_binary0 = f.read()
                local_offset, = _unpack_N(local_binary0[:4])
                local_binary = local_binary0[4:local_offset]
                # 256 nodes
                while ipdot0 >= 0:
                    middle_ip = None
                    middle_content = None
                    lis = []
                    # offset
                    begin_offset = ipdot0 * 4
                    end_offset = (ipdot0 + 1) * 4
                    # index
                    start_index, = _unpack_V(local_binary[begin_offset:begin_offset + 4])
                    start_index = start_index * 8 + 1024
                    end_index, = _unpack_V(local_binary[end_offset:end_offset + 4])
                    end_index = end_index * 8 + 1024
                    while start_index < end_index:
                        content_offset, = _unpack_V(local_binary[start_index + 4: start_index + 7] +
                                                    chr(0).encode("utf-8"))
                        content_length, = _unpack_C(local_binary[start_index + 7])
                        content_offset = local_offset + content_offset - 1024
                        content = local_binary0[content_offset:content_offset + content_length]
                        if middle_content != content and middle_content is not None:
                            contents = middle_content.split("	")
                            lis.append((middle_ip, (contents[0], self.lookup_country_code(contents[0]),
                                                    contents[1], self.lookup_china_province_code(contents[1]),
                                                    contents[2], self.lookup_china_city_code(contents[2]),
                                                    contents[3], contents[4])))
                        middle_content, = content,
                        middle_ip = inet_ntoa(local_binary[start_index:start_index + 4])
                        start_index += 8
                    self.ip_dict[ipdot0] = self.generate_tree(lis)
                    ipdot0 -= 1
        except Exception as ex:
            print "cannot open file %s: %s" % (file, ex)
            print ex.message
            exit(0)

    def lookup_country(self, country_code):
        try:
            for item_country, item_country_code in self.country_codes.items():
                if country_code == item_country_code:
                    return item_country, item_country_code
            return "None", "None"
        except KeyError:
            return "None", "None"

    def lookup_country_code(self, country):
        try:
            return self.country_codes[country]
        except KeyError:
            return "None"

    def lookup_china_province(self, province_code):
        try:
            for item_province, item_province_code, in self.china_province_codes.items():
                if province_code == item_province_code:
                    return item_province, item_province_code
            return "None", "None"
        except KeyError:
            return "None", "None"

    def lookup_china_province_code(self, province):
        try:
            return self.china_province_codes[province.encode("utf-8")]
        except KeyError:
            return "None"

    def lookup_china_city(self, city_code):
        try:
            for item_city, item_city_code in self.china_city_codes.items():
                if city_code == item_city_code:
                    return item_city, item_city_code
            return "None", "None"
        except KeyError:
            return "None", "None"

    def lookup_china_city_code(self, city):
        try:
            return self.china_city_codes[city]
        except KeyError:
            return "None"

    def lookup(self, ip):
        ipdot = ip.split(".")
        ipdot0 = int(ipdot[0])
        if ipdot0 < 0 or ipdot0 > 255 or len(ipdot) != 4:
            return None
        try:
            d = self.ip_dict[int(ipdot[0])]
        except KeyError:
            return None
        if d is not None:
            return self.lookup1(inet_aton(ip), d)
        else:
            return None

    def lookup1(self, net_ip, (net_ip1, content, lefts, rights)):
        if net_ip < net_ip1:
            if lefts is None:
                return content
            else:
                return self.lookup1(net_ip, lefts)
        elif net_ip > net_ip1:
            if rights is None:
                return content
            else:
                return self.lookup1(net_ip, rights)
        else:
            return content

    def generate_tree(self, ip_list):
        length = len(ip_list)
        if length > 1:
            lefts = ip_list[:length / 2]
            rights = ip_list[length / 2:]
            (ip, content) = lefts[length / 2 - 1]
            return inet_aton(ip), content, self.generate_tree(lefts), self.generate_tree(rights)
        elif length == 1:
            (ip, content) = ip_list[0]
            return inet_aton(ip), content, None, None
        else:
            return

if __name__ == "__main__":
    import sys

    reload(sys)
    sys.setdefaultencoding("utf-8")
    ip_tree = IpTree()
    ip_tree.load_country_codes("doc/country_list.txt")
    ip_tree.load_china_province_codes("doc/china_province_code.txt")
    ip_tree.load_china_city_codes("doc/china_city_code.txt")
    ip_tree.loadfile("doc/mydata4vipday2.dat")
    print ip_tree.lookup("123.12.23.45")
http请求
提供ip查询服务的GET请求和POST请求
@ip_app.route("/api/ip_query", methods=["POST"])
def ip_query():
    try:
        ip = request.json["ip"]
    except KeyError as e:
        raise InvalidUsage("bad request: no key ip in your request json body. {}".format(e), status_code=400)
    if not is_ip(ip):
        raise InvalidUsage("{} is not a ip".format(ip), status_code=400)
    try:
        res = ip_tree.lookup(ip)
    except Exception as e:
        raise InvalidUsage("internal error: {}".format(e), status_code=500)
    if res is not None:
        return jsonify(res)
    else:
        raise InvalidUsage("no ip info in ip db for ip: {}".format(ip), status_code=501)


@ip_app.route("/api/ip_query", methods=["GET"])
def ip_query_get():
    try:
        ip = request.values.get("ip")
    except ValueError as e:
        raise InvalidUsage("bad request: no param ip in your request. {}".format(e), status_code=400)
    if not is_ip(ip):
        raise InvalidUsage("{} is not a ip".format(ip), status_code=400)
    try:
        res = ip_tree.lookup(ip)
    except Exception as e:
        raise InvalidUsage("internal error: {}".format(e), status_code=500)
    if res is not None:
        return jsonify(res)
    else:
        raise InvalidUsage("no ip info in ip db for ip: {}".format(ip), status_code=501)
POST请求需要在请求体中包含类似下面的json字段
{
	"ip": "165.118.213.9"
}
GET请求的形式如:http://127.0.0.1:5000/api/ip_query?ip=165.118.213.9
服务部署
安装依赖库
依赖的库requirements.txt如下:
certifi==2017.7.27.1
chardet==3.0.4
click==6.7
Flask==0.12.2
gevent==1.1.1
greenlet==0.4.12
gunicorn==19.7.1
idna==2.5
itsdangerous==0.24
Jinja2==2.9.6
locustio==0.7.5
MarkupSafe==1.0
meld3==1.0.2
msgpack-python==0.4.8
requests==2.18.3
supervisor==3.3.3
urllib3==1.22
Werkzeug==0.12.2
安装方法:pip install -r requirements.txt
配置supervisor
vim /etc/supervisor/conf.d/ip_query_http_service.conf,内容如下
[program:ip_query_http_service]
directory = /root/qk_python/ip_query
command = gunicorn -w10 -b0.0.0.0:8080 ip_query_app:ip_app --worker-class gevent
autostart = true
startsecs = 5
autorestart = true
startretries = 3
user = root
stdout_logfile=/root/qk_python/ip_query/log/gunicorn.log
stderr_logfile=/root/qk_python/ip_query/log/gunicorn.err
内容添加完成之后,需要创建stdout_logfile和stderr_logfile这两个目录,否则supervisor启动会报错。然后更新supervisor启动ip_query_http_service进程。
# 启动supervisor
supervisord -c /etc/supervisor/supervisord.conf

# 更新supervisor服务
supervisorctl update
关于supervisor的常用操作参见最后面的参考资料。
安装nginx
如果是软负载的形式需要安装nginx,编译安装nginx的方法参见最后面的参考资料。
配置nginx
vim /usr/local/nginx/nginx.conf,修改配置文件内容如下:
#user  nobody;
#nginx进程数,建议设置为等于CPU总核心数。
worker_processes  4;
#error_log  logs/error.log;
#error_log  logs/error.log  notice;
#全局错误日志定义类型,[ debug | info | notice | warn | error | crit ]
error_log  logs/error.log  info;
#进程文件
pid        logs/nginx.pid;
#一个nginx进程打开的最多文件描述符数目,理论值应该是最多打开文件数(系统的值ulimit -n)与nginx进程数相除,但是nginx分配请求并不均匀,所以建议与ulimit -n的值保持一致。
worker_rlimit_nofile 65535;
events {
    #参考事件模型 linux 下使用epoll
    use epoll;
    #单个进程最大连接数(最大连接数=连接数*进程数)
    worker_connections  65535;
}

http {
    include       mime.types;
    default_type  application/octet-stream;
    log_format  main  "$remote_addr - $remote_user [$time_local] "$request" "
    "$status $body_bytes_sent "$http_referer" "
    ""$http_user_agent" "$http_x_forwarded_for"";
    access_log  logs/access.log  main;
    sendfile        on;
    #keepalive_timeout  0;
    keepalive_timeout  65;
    tcp_nopush on; #防止网络阻塞
    tcp_nodelay on; #防止网络阻塞
    #gzip  on;
    server {
		#这里配置衔接服务提供的代理端口.
        listen       9000;
        server_name  localhost;
        #charset koi8-r;
        #access_log  logs/host.access.log  main;
        location / {
            #            root   html;
            #            index  index.html index.htm;
            proxy_pass http://127.0.0.1:8000;
            proxy_redirect off;
            proxy_set_header X-Real-IP $remote_addr;
            #后端的Web服务器可以通过X-Forwarded-For获取用户真实IP
            proxy_set_header X-Forwarded-For $proxy_add_x_forwarded_for;
            proxy_set_header Host $host;
            client_max_body_size 10m; #允许客户端请求的最大单文件字节数
            client_body_buffer_size 128k; #缓冲区代理缓冲用户端请求的最大字节数,
            proxy_buffer_size 4k; #设置代理服务器(nginx)保存用户头信息的缓冲区大小
            proxy_temp_file_write_size 64k;       #设定缓存文件夹大小,大于这个值,将从upstream服务器传
        }

        #error_page  404              /404.html;
        # redirect server error pages to the static page /50x.html
        #
        error_page   500 502 503 504  /50x.html;
        location = /50x.html {
            root   html;
        }
    }
}
压力测试
做压力测试,选择正确的工具是前提。以下工具中,jmeter运行在windows机器较多,其他工具建议都运行在*nix机器上。
压力测试工具选择
| 工具名称 | 优缺点 | 建议 |
|---|---|---|
| ApacheBench(ab) | 命令使用简单,效率高,统计信息完善,施压机器内存压力小 | 推荐 |
| locust | python编写,效率低,受限于GIL,需要编写python测试脚本 | 不推荐 |
| wrk | 命令使用简单,效率高,统计信息精炼,坑少,少报错 | 最推荐 |
| jmeter | 基于java,Apache开源,图形化界面,操作简便 | 推荐 |
| webbench | 使用简单,但是不支持POST请求 | 一般 |
| tsung | erlang编写,配置模板较多,较复杂 | 不推荐 |
上述六种工具全部亲身使用过,下面选择ab、wrk、jmeter三种工具简单说明安装使用方法,其他工具的使用方法如有需要,自行google
ab
安装
apt-get install apache2-utils
常见options
| option | 含义 |
|---|---|
| -r | 当接收到socket错误的时候ab不退出 |
| -t | 发送请求的最长时间 |
| -c | 并发数,一次构造的请求数量 |
| -n | 发送的请求数量 |
| -p | postfile,指定包含post数据的文件 |
| -T | content-type,指定post和put发送请求时请求体的类型 |
使用
测试GET请求
ab -r -t 120 -c 5000 http://127.0.0.1:8080/api/ip_query?ip=165.118.213.9
测试POST请求
ab -r -t 120 -c 5000 -p /tmp/post_data.txt -T "application/json" http://127.0.0.1:8080/api/ip_query
其中/tmp/post_data.txt文件的内容为待发送的-T指定格式的数据,在此处为json格式
{"ip": "125.118.213.9"}
wrk
http://www.restran.net/2016/09/27/wrk-http-benchmark/
安装
apt-get install libssl-dev
git clone https://github.com/wg/wrk.git
cd wrk
make
cp wrk /usr/sbin
常见options
| option | 含义 |
|---|---|
| -c | 打开的连接数,即并发数 |
| -d | 压力测试时间:发送请求的最长时间 |
| -t | 施压机器使用的线程数量 |
| -s | 指定要加载的lua脚本 |
| –latency | 打印延迟统计信息 |
使用
测试GET请求
wrk -t10 -c5000 -d120s --latency http://127.0.0.1:8080/api/ip_query?ip=165.118.213.9
测试POST请求
wrk -t50 -c5000 -d120s --latency -s /tmp/wrk_post.lua http://127.0.0.1:8080
其中/tmp/wrk_post.lua文件的内容为待加载的lua脚本,指定post的path,header,body
request = function()
  path = "/api/ip_query"
  wrk.headers["Content-Type"] = "application/json"
  wrk.body = "{"ip":"125.118.213.9"}"
  return wrk.format("POST", path)
end
jmeter
安装
安装jmeter前需要先安装jdk1.8。然后在Apache官网可以下载jmeter,点此下载
使用

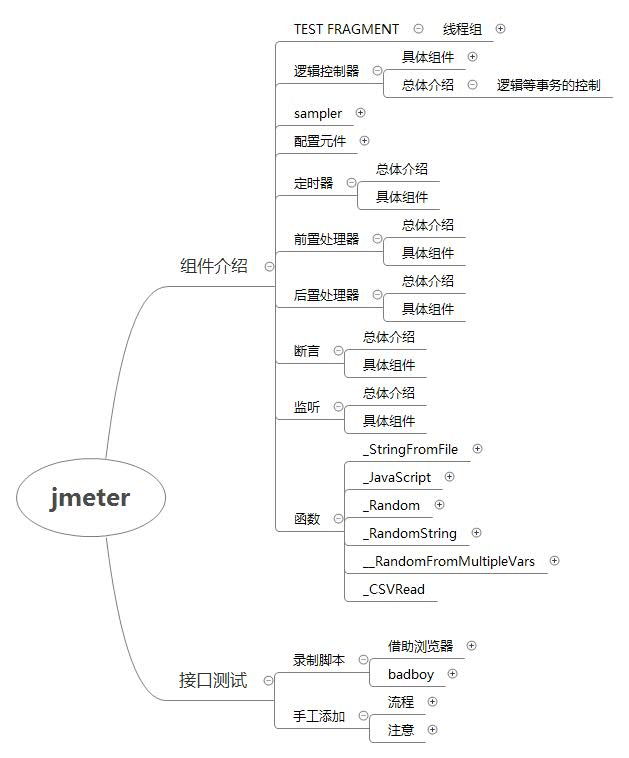
以上图片来自一个测试大牛,非常详细,完整的xmind文件下载见:jmeter-张蓓.xmind
jmeter的入门级使用也可以参考最后面的参考资料部分:使用Apache Jmeter进行并发压力测试
压力测试结果分析
wrk GET请求压测结果
root@ubuntu:/tmp# wrk -t10 -c5000 -d60s --latency http://127.0.0.1:8080/api/ip_query?ip=165.118.213.9
Running 1m test @ http://127.0.0.1:8080/api/ip_query?ip=165.118.213.9
  10 threads and 5000 connections
  Thread Stats   Avg      Stdev     Max   +/- Stdev
    Latency   897.19ms  322.83ms   1.99s    70.52%
    Req/Sec   318.80    206.03     2.14k    68.84%
  Latency Distribution
     50%  915.29ms
     75%    1.11s
     90%    1.29s
     99%    1.57s
  187029 requests in 1.00m, 51.01MB read
  Socket errors: connect 0, read 0, write 0, timeout 38
Requests/sec:   3113.27
Transfer/sec:    869.53KB
ab GET请求压测结果
root@ubuntu:/tmp# ab -r -t 60 -c 5000 http://127.0.0.1:8080/api/ip_query?ip=165.118.213.9
This is ApacheBench, Version 2.3 <$Revision: 1796539 $>
Copyright 1996 Adam Twiss, Zeus Technology Ltd, http://www.zeustech.net/
Licensed to The Apache Software Foundation, https://www.apache.org/

Benchmarking 127.0.0.1 (be patient)
Completed 5000 requests
Completed 10000 requests
Completed 15000 requests
Completed 20000 requests
Completed 25000 requests
Completed 30000 requests
Completed 35000 requests
Completed 40000 requests
Completed 45000 requests
Completed 50000 requests
Finished 50000 requests


Server Software:        gunicorn/19.7.1
Server Hostname:        127.0.0.1
Server Port:            8080

Document Path:          /api/ip_query?ip=165.118.213.9
Document Length:        128 bytes

Concurrency Level:      5000
Time taken for tests:   19.617 seconds
Complete requests:      50000
Failed requests:        2
   (Connect: 0, Receive: 0, Length: 1, Exceptions: 1)
Total transferred:      14050000 bytes
HTML transferred:       6400000 bytes
Requests per second:    2548.85 [#/sec] (mean)
Time per request:       1961.668 [ms] (mean)
Time per request:       0.392 [ms] (mean, across all concurrent requests)
Transfer rate:          699.44 [Kbytes/sec] received

Connection Times (ms)
              min  mean[+/-sd] median   max
Connect:        0  597 1671.8      4   15500
Processing:     4  224 201.4    173    3013
Waiting:        4  223 200.1    172    2873
Total:          7  821 1694.4    236   15914

Percentage of the requests served within a certain time (ms)
  50%    236
  66%    383
  75%   1049
  80%   1155
  90%   1476
  95%   3295
  98%   7347
  99%   7551
 100%  15914 (longest request)
jmeter GET请求压测结果

结果分析
以上三个工具的压测结果大体相同,RPS(Requests per second)大致在3000左右,此时机器配置为4核4G内存,并且gunicorn开了10个worker,内存占用3.2G。单台机器只有3000并发,对于此配置的机器来说,需要进一步分析原因。后续再弄一台机器,负载均衡后能达到5000以上才能满足使用要求。
压力测试注意事项
文件打开数
压力测试时对施压机器的文件打开数一般有要求,远不止1024个open files,需要增加linux系统的文件打开数,增加方法:
# 文件打开数
ulimit -a
# 修改文件打开数
ulimit -n 500000
SYN洪水攻击保护
linux系统中有一个参数:/etc/sysctl.conf配置文件中的net.ipv4.tcp_syncookies字段。这个字段值默认为1,表示系统会检测SYN洪水攻击,并开启保护。因此压测时,如果发送大量重复性数据的请求,受压机器SYN队列溢出之后启用SYN cookie,导致会有大量请求超时失败。阿里云的负载均衡是有SYN洪水攻击检测和DDos攻击检测功能的,因此在做压力测试时需要注意两点:
- 测试时适当关闭负载均衡机器的 net.ipv4.tcp_syncookies 字段
- 造数据时应该尽量避免大量重复性数据,以免被识别为攻击。
gunicorn简介及调优
关于gunicorn的选择可以参考测试报告:Python WSGI Server 性能分析
在选定gunicorn作为WSGI server之后,需要根据机器选择相应的worker数量以及每个worker的worker-class。
worker数量选择
每一个worker都是作为一个单独的子进程来运行,都持有一份独立的内存数据,每增加或减少一个worker,系统内存明显的成倍数的改变。最初单台机器gunicorn开启3个worker,系统只支持1000RPS的并发。当把worker扩展为9个之后,系统支持3000RPS的并发。因此在内存足够的时候,可以适当增加worker数量。
worker-class选择
可以参考尾部的参考资料中的gunicorn常用settings和Gunicorn 几种 Worker class 性能测试比较这两篇文章。
将gunicorn启动时的worker-class从默认的sync改成gevent之后,系统RPS直接翻倍。
| worker-class | worker数量 | ab测试的RPS |
|---|---|---|
| sync | 3 | 573.90 |
| gevent | 3 | 1011.84 |
gevent依赖:gevent >= 0.13。因此需要先使用pip安装。对应的gunicorn启动flask应用的命令需要修改为:
gunicorn -w10 -b0.0.0.0:8080 ip_query_app:ip_app --worker-class gevent
改进点
改进ip数据库准确性
损失效率换取准确性:使用单一ip数据库会存在一些ip无法查询出结果的情况,并且国外ip一般只能精确到国家。可以平衡几家ip数据库的准确度和覆盖率,当无法查询出准确的地址信息时去查询另外几个ip数据库。
提高单台机器并发量
从发起请求,到WSGI服务器处理,到应用接口,到ip查询每个过程都需要单独分析每秒可执行量,进而分析系统瓶颈,从根本上提高单机并发量。
参考资料
- 全球 IPv4 地址归属地数据库(IPIP.NET 版)
- 使用flask开发RESTful架构的api服务器端(5)–部署flask应用到nginx
- python web 部署:nginx + gunicorn + supervisor + flask 部署笔记
- flowsnow-nginx编译安装
- supervisor推荐教程-使用 supervisor 管理进程
- 维基-二叉查找树
- 简书-wrk压力测试post接口
- 使用Apache Jmeter进行并发压力测试
- gunicorn常用settings
- Gunicorn 几种 Worker class 性能测试比较
记得帮我点赞哦!
精心整理了计算机各个方向的从入门、进阶、实战的视频课程和电子书,按照目录合理分类,总能找到你需要的学习资料,还在等什么?快去关注下载吧!!!
念念不忘,必有回响,小伙伴们帮我点个赞吧,非常感谢。
我是职场亮哥,YY高级软件工程师、四年工作经验,拒绝咸鱼争当龙头的斜杠程序员。
听我说,进步多,程序人生一把梭
如果有幸能帮到你,请帮我点个【赞】,给个关注,如果能顺带评论给个鼓励,将不胜感激。
职场亮哥文章列表:更多文章

本人所有文章、回答都与版权保护平台有合作,著作权归职场亮哥所有,未经授权,转载必究!

![设计一个基于flask的高并发高可用的查询ip的http服务[Python基础]](https://www.zixueka.com/wp-content/uploads/2023/10/1696831853-149a405f2b265e1.jpg)
