Spring Cloud Alibaba 环境搭建 – IT
可以手动从一个 Maven 项目进行搭建,后期也可以利用 Idea 工具直接从阿里云官网进行快捷搭建,网址为Aliyun Java Initializr,类似于 SpringBoot 的初始化向导 Spring Initializr。我们逐层进行演示
一、分布式环境搭建
1. 创建父级 Spring Boot 项目
pom.xml
<?xml version="1.0" encoding="UTF-8"?>
<project xmlns="http://maven.apache.org/POM/4.0.0" xmlns:xsi="http://www.w3.org/2001/XMLSchema-instance"
         xsi:schemaLocation="http://maven.apache.org/POM/4.0.0 https://maven.apache.org/xsd/maven-4.0.0.xsd">
    <modelVersion>4.0.0</modelVersion>

    <!--parent中使用的版本管理器一般是自己公司内部的版本管理器,对于第三方的版本管理器一般放在dependencyManagement中-->

    <groupId>com.pushihao</groupId>
    <artifactId>test</artifactId>
    <version>0.0.1-SNAPSHOT</version>
    <name>test</name>
    <description>test</description>
    <properties>
        <java.version>11</java.version>
        <spring.boot.version>2.6.7</spring.boot.version>
    </properties>

    <dependencyManagement>
        <dependencies>

            <!--spring-boot版本管理器-->
            <dependency>
                <groupId>org.springframework.boot</groupId>
                <artifactId>spring-boot-starter-parent</artifactId>
                <version>${spring.boot.version}</version>
                <type>pom</type>
                <scope>import</scope>
            </dependency>
        </dependencies>
    </dependencyManagement>

    <dependencies>
        <dependency>
            <groupId>org.springframework.boot</groupId>
            <artifactId>spring-boot-starter</artifactId>
        </dependency>

        <dependency>
            <groupId>org.springframework.boot</groupId>
            <artifactId>spring-boot-starter-test</artifactId>
            <scope>test</scope>
        </dependency>
    </dependencies>

    <build>
        <plugins>
            <plugin>
                <groupId>org.springframework.boot</groupId>
                <artifactId>spring-boot-maven-plugin</artifactId>
            </plugin>
        </plugins>
    </build>

</project>
2. 新建两个模块
新建子模块时最好新建 Maven 项目,因为可以设置父项目。如果新建 Spring Boot Initializr 则默认父项目是 spring-boot-starter-parent
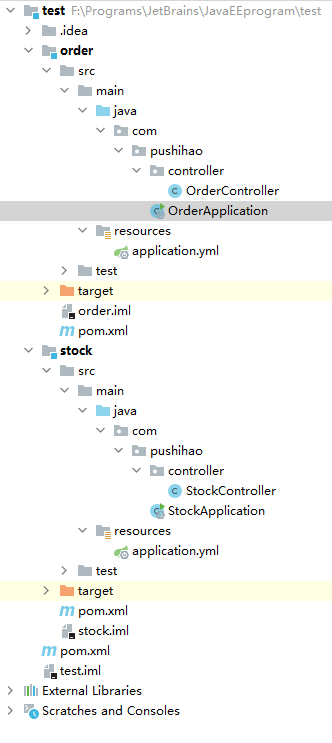
这里以订单模块(order)和仓库模块(stock)为例
假设仓库模块为生产者,订单模块为调用者。当调用订单模块时,订单模块调用仓库模块,使库存减一
项目结构如下:

具体文件:
pom.xml (两个模块的 pom.xml 几乎相同)
<?xml version="1.0" encoding="UTF-8"?>
<project xmlns="http://maven.apache.org/POM/4.0.0"
         xmlns:xsi="http://www.w3.org/2001/XMLSchema-instance"
         xsi:schemaLocation="http://maven.apache.org/POM/4.0.0 http://maven.apache.org/xsd/maven-4.0.0.xsd">
    <parent>
        <artifactId>SpringCloud</artifactId>
        <groupId>com.pushihao</groupId>
        <version>0.0.1-SNAPSHOT</version>
    </parent>
    <modelVersion>4.0.0</modelVersion>

    <!--此处为stock或order(模块名)-->
    <artifactId>stock</artifactId>

    <dependencies>
        <dependency>
            <groupId>org.springframework.boot</groupId>
            <artifactId>spring-boot-starter-web</artifactId>
        </dependency>
    </dependencies>

</project>
StockApplication.java
package com.pushihao;

import org.springframework.boot.SpringApplication;
import org.springframework.boot.autoconfigure.SpringBootApplication;

@SpringBootApplication
public class StockApplication {
    public static void main(String[] args) {
        SpringApplication.run(StockApplication.class, args);
    }
}
StockController.java
package com.pushihao.controller;

import org.springframework.web.bind.annotation.GetMapping;
import org.springframework.web.bind.annotation.RequestMapping;
import org.springframework.web.bind.annotation.RestController;

@RestController
@RequestMapping("/stock")
public class StockController {

    @GetMapping("reduct")
    public String reduct() {
        System.out.println("库存减一");
        return "success!";
    }
}
OrderApplication.java
package com.pushihao;

import org.springframework.boot.SpringApplication;
import org.springframework.boot.autoconfigure.SpringBootApplication;
import org.springframework.boot.web.client.RestTemplateBuilder;
import org.springframework.context.annotation.Bean;
import org.springframework.web.client.RestTemplate;

@SpringBootApplication
public class OrderApplication {
    public static void main(String[] args) {
        SpringApplication.run(OrderApplication.class, args);
    }

    @Bean
    public RestTemplate restTemplate(RestTemplateBuilder builder) {
        return builder.build();
    }
}
OrderController.java
package com.pushihao.controller;

import org.springframework.beans.factory.annotation.Autowired;
import org.springframework.web.bind.annotation.GetMapping;
import org.springframework.web.bind.annotation.RequestMapping;
import org.springframework.web.bind.annotation.RestController;
import org.springframework.web.client.RestTemplate;

@RestController
@RequestMapping("/order")
public class OrderController {

    @Autowired
    private RestTemplate restTemplate;

    @GetMapping("add")
    public String add() {
        System.out.println("订单加一");
        //result为返回结果
        String result = restTemplate.getForObject("http://localhost:9001/stock/reduct", String.class);
        return "success!";
    }
}
至此,一个简单的分布式环境就搭建好了,使用浏览器调用 http://localhost:9002/order/add 就可以看到结果


二、Spring Cloud Alibaba 环境搭建
可以直接在原有的分布式环境上直接引用 Spring Cloud Alibaba 即可
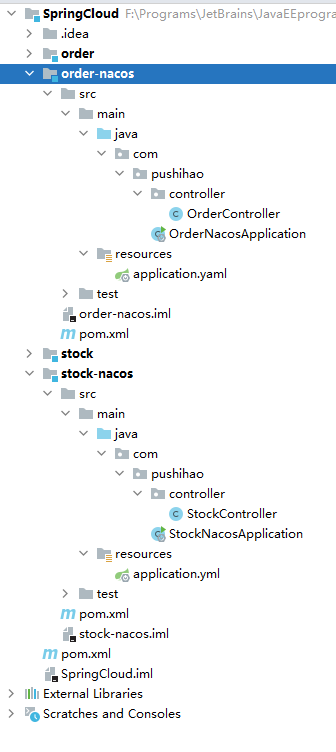
项目结构如下:

1. 导入 Spring Cloud Alibaba 和 Spring Cloud 的坐标
注意:版本号一定要选对(按照要求)参考 版本说明
稳定版本依赖关系
| Spring Cloud Alibaba Version | Spring Cloud Version | Spring Boot Version |
|---|---|---|
| 2021.0.1.0 | Spring Cloud 2021.0.1 | 2.6.3 |
| 2.2.7.RELEASE | Spring Cloud Hoxton.SR12 | 2.3.12.RELEASE |
| 2021.1 | Spring Cloud 2020.0.1 | 2.4.2 |
| 2.2.6.RELEASE | Spring Cloud Hoxton.SR9 | 2.3.2.RELEASE |
| 2.1.4.RELEASE | Spring Cloud Greenwich.SR6 | 2.1.13.RELEASE |
| 2.2.1.RELEASE | Spring Cloud Hoxton.SR3 | 2.2.5.RELEASE |
| 2.2.0.RELEASE | Spring Cloud Hoxton.RELEASE | 2.2.X.RELEASE |
| 2.1.2.RELEASE | Spring Cloud Greenwich | 2.1.X.RELEASE |
| 2.0.4.RELEASE(停止维护,建议升级) | Spring Cloud Finchley | 2.0.X.RELEASE |
| 1.5.1.RELEASE(停止维护,建议升级) | Spring Cloud Edgware | 1.5.X.RELEASE |
组件版本关系(一般由Spring Cloud Alibaba 版本管理器直接控制,我们不用关心)
| Spring Cloud Alibaba Version | Sentinel Version | Nacos Version | RocketMQ Version | Dubbo Version | Seata Version |
|---|---|---|---|---|---|
| 2021.0.1.0* | 1.8.3 | 1.4.2 | 4.9.2 | 2.7.15 | 1.4.2 |
| 2.2.7.RELEASE | 1.8.1 | 2.0.3 | 4.6.1 | 2.7.13 | 1.3.0 |
| 2.2.6.RELEASE | 1.8.1 | 1.4.2 | 4.4.0 | 2.7.8 | 1.3.0 |
| 2021.1 or 2.2.5.RELEASE or 2.1.4.RELEASE or 2.0.4.RELEASE | 1.8.0 | 1.4.1 | 4.4.0 | 2.7.8 | 1.3.0 |
| 2.2.3.RELEASE or 2.1.3.RELEASE or 2.0.3.RELEASE | 1.8.0 | 1.3.3 | 4.4.0 | 2.7.8 | 1.3.0 |
| 2.2.1.RELEASE or 2.1.2.RELEASE or 2.0.2.RELEASE | 1.7.1 | 1.2.1 | 4.4.0 | 2.7.6 | 1.2.0 |
| 2.2.0.RELEASE | 1.7.1 | 1.1.4 | 4.4.0 | 2.7.4.1 | 1.0.0 |
| 2.1.1.RELEASE or 2.0.1.RELEASE or 1.5.1.RELEASE | 1.7.0 | 1.1.4 | 4.4.0 | 2.7.3 | 0.9.0 |
| 2.1.0.RELEASE or 2.0.0.RELEASE or 1.5.0.RELEASE | 1.6.3 | 1.1.1 | 4.4.0 | 2.7.3 | 0.7.1 |
这里使用最新稳定版即可
<?xml version="1.0" encoding="UTF-8"?>
<project xmlns="http://maven.apache.org/POM/4.0.0" xmlns:xsi="http://www.w3.org/2001/XMLSchema-instance"
         xsi:schemaLocation="http://maven.apache.org/POM/4.0.0 https://maven.apache.org/xsd/maven-4.0.0.xsd">
    <modelVersion>4.0.0</modelVersion>

    <!--parent中使用的版本管理器一般是自己公司内部的版本管理器,对于第三方的版本管理器一般放在dependencyManagement中-->

    <groupId>com.pushihao</groupId>
    <artifactId>test</artifactId>
    <packaging>pom</packaging>
    <version>0.0.1-SNAPSHOT</version>
    <modules>
        <module>order</module>
        <module>stock</module>
        <module>order-nacos</module>
        <module>stock-nacos</module>
    </modules>
    <name>test</name>
    <description>test</description>
    <properties>
        <java.version>11</java.version>
        <spring.boot.version>2.3.12.RELEASE</spring.boot.version>
        <spring.cloud.version>Hoxton.SR12</spring.cloud.version>
        <spring.cloud.alibaba.version>2.2.7.RELEASE</spring.cloud.alibaba.version>
    </properties>

    <dependencyManagement>
        <dependencies>

            <!--spring-boot版本管理器-->
            <dependency>
                <groupId>org.springframework.boot</groupId>
                <artifactId>spring-boot-starter-parent</artifactId>
                <version>${spring.boot.version}</version>
                <type>pom</type>
                <scope>import</scope>
            </dependency>

            <!--spring-cloud版本管理器-->
            <dependency>
                <groupId>org.springframework.cloud</groupId>
                <artifactId>spring-cloud-dependencies</artifactId>
                <version>${spring.cloud.version}</version>
                <type>pom</type>
                <scope>import</scope>
            </dependency>

            <!--spring-cloud-alibaba版本管理器-->
            <dependency>
                <groupId>com.alibaba.cloud</groupId>
                <artifactId>spring-cloud-alibaba-dependencies</artifactId>
                <version>${spring.cloud.alibaba.version}</version>
                <type>pom</type>
                <scope>import</scope>
            </dependency>
        </dependencies>
    </dependencyManagement>

    <dependencies>
        <dependency>
            <groupId>org.springframework.boot</groupId>
            <artifactId>spring-boot-starter</artifactId>
        </dependency>

        <dependency>
            <groupId>org.springframework.boot</groupId>
            <artifactId>spring-boot-starter-test</artifactId>
            <scope>test</scope>
        </dependency>
    </dependencies>

    <build>
        <plugins>
            <plugin>
                <groupId>org.springframework.boot</groupId>
                <artifactId>spring-boot-maven-plugin</artifactId>
            </plugin>
        </plugins>
    </build>

</project>
2.1 新建 stock-nacos 模块
pom.xml
<?xml version="1.0" encoding="UTF-8"?>
<project xmlns="http://maven.apache.org/POM/4.0.0"
         xmlns:xsi="http://www.w3.org/2001/XMLSchema-instance"
         xsi:schemaLocation="http://maven.apache.org/POM/4.0.0 http://maven.apache.org/xsd/maven-4.0.0.xsd">
    <parent>
        <artifactId>SpringCloud</artifactId>
        <groupId>com.pushihao</groupId>
        <version>0.0.1-SNAPSHOT</version>
    </parent>
    <modelVersion>4.0.0</modelVersion>
    <artifactId>stock-nacos</artifactId>

    <dependencies>
        <dependency>
            <groupId>org.springframework.boot</groupId>
            <artifactId>spring-boot-starter-web</artifactId>
        </dependency>

		<!--注册与发现-->
        <dependency>
            <groupId>com.alibaba.cloud</groupId>
            <artifactId>spring-cloud-starter-alibaba-nacos-discovery</artifactId>
        </dependency>
    </dependencies>

    <build>
        <plugins>
            <plugin>
                <groupId>org.apache.maven.plugins</groupId>
                <artifactId>maven-compiler-plugin</artifactId>
                <version>3.8.1</version>
                <configuration>
                    <source>11</source>
                    <target>11</target>
                </configuration>
            </plugin>
        </plugins>
    </build>

</project>
application.yml
server:
  port: 9001
spring:
  application:
    name: stock-service
  cloud:
    nacos:
      server-addr: 127.0.0.1:8848
      discovery:
        username: nacos
        password: nacos
        cluster-name: public
StockNacosApplication.java
package com.pushihao;

import org.springframework.boot.SpringApplication;
import org.springframework.boot.autoconfigure.SpringBootApplication;

@SpringBootApplication
public class StockNacosApplication {
    public static void main(String[] args) {
        SpringApplication.run(StockNacosApplication.class, args);
    }
}
StockController.java
package com.pushihao.controller;

import org.springframework.web.bind.annotation.GetMapping;
import org.springframework.web.bind.annotation.RequestMapping;
import org.springframework.web.bind.annotation.RestController;

@RestController
@RequestMapping("/stock")
public class StockController {

    @GetMapping("reduct")
    public String reduct() {
        System.out.println("库存减一");
        return "success!";
    }
}
2.2 新建 order-nacos 模块
pom.xml
<?xml version="1.0" encoding="UTF-8"?>
<project xmlns="http://maven.apache.org/POM/4.0.0"
         xmlns:xsi="http://www.w3.org/2001/XMLSchema-instance"
         xsi:schemaLocation="http://maven.apache.org/POM/4.0.0 http://maven.apache.org/xsd/maven-4.0.0.xsd">
    <parent>
        <artifactId>test</artifactId>
        <groupId>com.pushihao</groupId>
        <version>0.0.1-SNAPSHOT</version>
    </parent>
    <modelVersion>4.0.0</modelVersion>

    <artifactId>order-nacos</artifactId>

    <dependencies>
        <dependency>
            <groupId>org.springframework.boot</groupId>
            <artifactId>spring-boot-starter-web</artifactId>
        </dependency>

        <dependency>
            <groupId>com.alibaba.cloud</groupId>
            <artifactId>spring-cloud-starter-alibaba-nacos-discovery</artifactId>
        </dependency>
    </dependencies>

    <build>
        <plugins>
            <plugin>
                <groupId>org.apache.maven.plugins</groupId>
                <artifactId>maven-compiler-plugin</artifactId>
                <version>3.8.1</version>
                <configuration>
                    <source>11</source>
                    <target>11</target>
                </configuration>
            </plugin>
        </plugins>
    </build>

</project>
application.yml
server:
  port: 9001
spring:
  application:
    name: order-service
  cloud:
    nacos:
      server-addr: 127.0.0.1:8848
      discovery:
        username: nacos
        password: nacos
        namespace: public
        # ephemeral: false  #是否是临时实例 默认是true(临时实例)  永久实例:哪怕宕机了也不会删除实例
OrderNacosApplication.java
package com.pushihao;

import org.springframework.boot.SpringApplication;
import org.springframework.boot.autoconfigure.SpringBootApplication;
import org.springframework.boot.web.client.RestTemplateBuilder;
import org.springframework.cloud.client.loadbalancer.LoadBalanced;
import org.springframework.context.annotation.Bean;
import org.springframework.web.client.RestTemplate;

@SpringBootApplication
public class OrderNacosApplication {
    public static void main(String[] args) {
        SpringApplication.run(OrderNacosApplication.class, args);
    }

    //加上@LoadBalanced就配上了默认的负载均衡器Ribbon
    @Bean
    @LoadBalanced
    public RestTemplate restTemplate(RestTemplateBuilder restTemplateBuilder) {
        return restTemplateBuilder.build();
    }
}
OrderController.java
package com.pushihao.controller;

import org.springframework.beans.factory.annotation.Autowired;
import org.springframework.web.bind.annotation.GetMapping;
import org.springframework.web.bind.annotation.RequestMapping;
import org.springframework.web.bind.annotation.RestController;
import org.springframework.web.client.RestTemplate;

@RestController
@RequestMapping("/order")
public class OrderController {

    @Autowired
    RestTemplate restTemplate;

    @GetMapping("add")
    public String add() {
        System.out.println("下单成功");

        //这里就可以把域名替换成对应的服务名,调用时就会启用默认的负载均衡机制
        String msg = restTemplate.getForObject("http://stock-service/stock/reduct", String.class);

        return "success!";
    }
}
至此 Spring Cloud Alibaba 环境就搭建完毕了
依次启动 nacos 服务器、stock-nacos、order-nacos
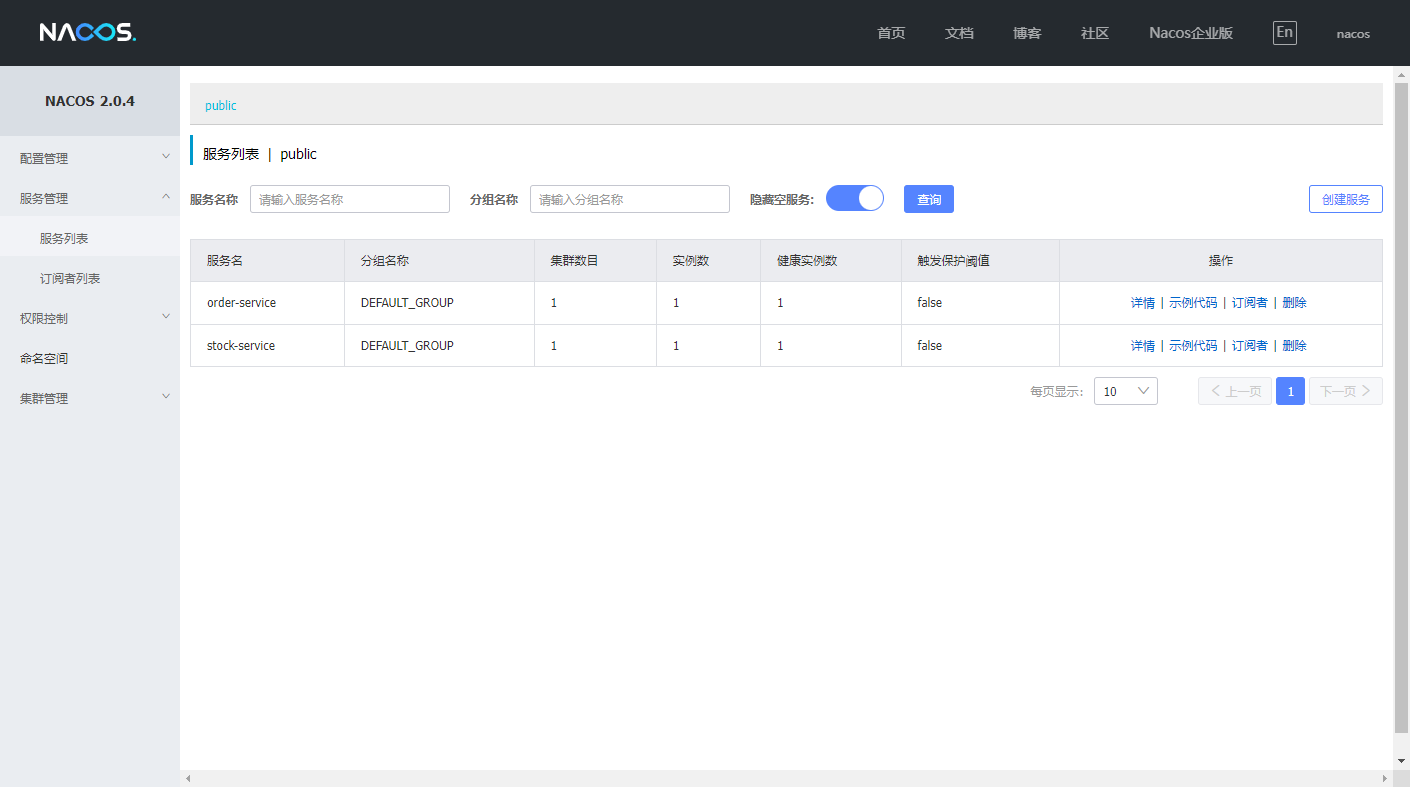
浏览器输入 http://localhost:8848/nacos 在服务管理一栏即可查看注册的微服务

浏览器输入 http://localhost:9001/order/add 即可查看运行结果


成功!
三、使用 Aliyun Java Initializr 快速构建
可以直接在网页上 Aliyun Java Initializr 进行配置,然后下载初始代码并导入编辑器工具中
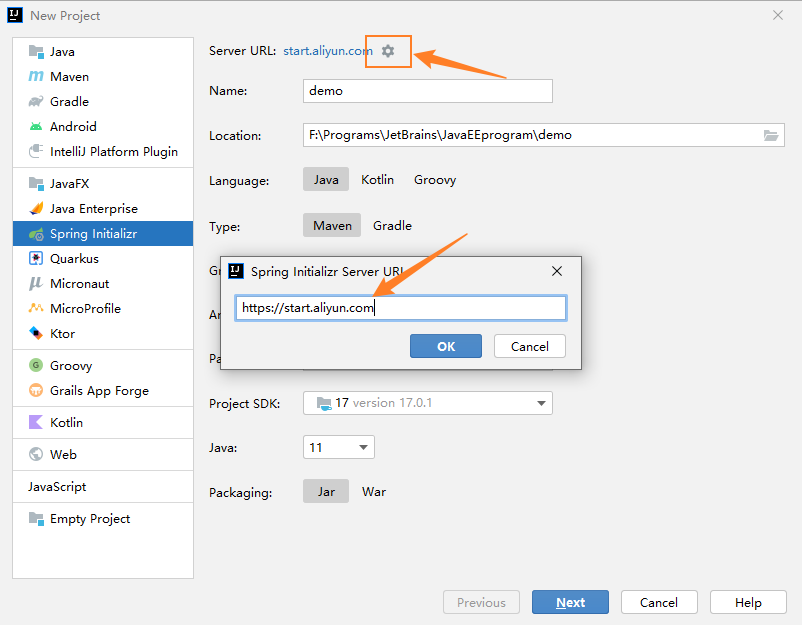
不过更多情况下,都是使用 Idea 工具进行快速构建,如下:

以上!


